Thursday, 16 August 2007 14:05
Technology News
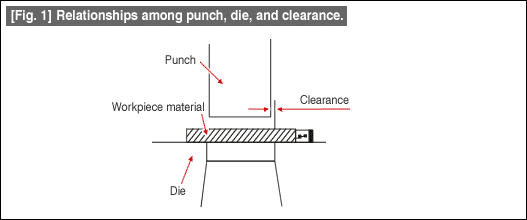
Clearance is the gap between the Punch and the Die as shown in Fig. 1.

If the clearance becomes large, although the force necessary for blanking will be small, the shear droop of the cut cross-section and the inclination of the fracture cross-section shown in Fig. 2 both become large.

The clearance values of the blanking are given in Table 1 below.
| [Table 1] Blanking clearance for different materials (as a % with respect to plate thickness) |
|
|
|
1. | For ordinary blanking, a larger clearance value is used as the plate thickness increases. |
| 2. | A smaller value is used when the blanking conditions are good such as for round holes, etc. | |
| 3. | A larger value is used when the blanking conditions are bad such as for square holes, etc. | |
| 4. | Secondary shear occurs easily if a small value is used for thick plates or for hard materials. | |
| 5. | Use a small value (use precision blanking, if possible) in the case of cutting operations. |
Generally, although it was considered good to prepare so that the clearance is uniform in all parts, recently it is considered good to change the clearance partially to suit the changes in the cutting conditions, thereby taking measures against wear of the punch and die, and against distortion of the product.
技术文章
- Preparing Compound Die Structures
- Blanking Force
- Capacity of Press Machine
- Die Height
- Method of Using Die Sets
- Bending Stamping Die Structure
- Die Structure---Blanking&Drawing
- Die Structure' Change Depending on the Guides
- Accuracy Judgment of Press Dies
- Plate Constitution of Stamping Dies
- Method for Compound Die Structures Preparing
- Design of Banking Dies Shape
- Basic Structures for Stamping Dies
- Tool Life of Stamping Dies
- Progressive Stamping Explaination
- What is Metal Stamping Tools
- Stamping Die Standard Parts Industry in China
- Main Operation Performed in a Stamping Die
- Clearance in the Blanking Procedure
- Punch and Die Disign for Punching Small Diameter Holes


